Why choose Panoptica?
Four reasons you need the industry’s leading cloud-native security solution.
In the first three entries in this series, we did everything from manual installation of Microsoft Defender for Endpoint (MDE) XDR agents on AWS EC2 instances, using AWS EC2 Image Builder for installing MDE, and using our tool – the Amazon Elastic Kubernetes Service (EKS) Creation Engine (ECE) – to install MDE on EKS Nodegroups. In this final entry of the series, we will go over more structured reporting using Amazon QuickSight, a cloud-native Business Intelligence (BI) tool.
In previous entries, we touched upon the various benefits of using MDE as your EDR/XDR agent. You can use it across all major operating systems and with some clever scripting, you can use it across multiple public cloud providers and generate provider-specific metadata. On its own, you can go very far using the Microsoft Defender 365 console, which centralizes vulnerability management, software asset inventory, anti-malware, anti-virus, and configuration compliance findings generated by MDE. However, the console does leave much to be desired, and providing access to a wider population of users who sit outside security may not be desirable.
To increase situational awareness of EDR and vulnerability management events within Panoptica, the Panoptica Office of the CISO aggregates and shapes the data for final presentation with QuickSight Dashboards that can be shared and embedded across the company. The dashboard contains high-level device information collected from MDE that is further enriched with Enterprise Resource Planning (ERP) and AWS metadata for the purpose of highly actionable intelligence. Some Key Performance Indicators (KPIs) that are recorded include:
These insights are used to treat risks and create action plans which can flow across various stakeholders such as DevOps, Platform Engineering, and others within the Office of the CTO. Using QuickSight allows the Panoptica Office of the CISO to reduce access into Microsoft 365 Defender, track KPIs, democratize the data to others, and pull out data that is only important (to us), provided by MDE. This reporting also helps support general Audit and Compliance activities such as inbound customer questionnaires issued by 3rd Party Risk Management programs or for SOC 2 Type II audits. Data visualization and dynamic filters provided by QuickSight, along with cloud-native automation helps the Office of the CISO maintain up-to-date information and empowers individual analysts and engineers to find the right data they need for informed decision making.
The solution that is provided for the purpose of this final entry of our Microsoft Defender for Endpoint on AWS series, is a slightly modified version of the actual data ingestion pipeline and final Dashboard used by the Panoptica Office of the CISO. It is our hope that you can use it as a basis for reporting on EDR and vulnerability management activities within your own enterprise. The solution will account for all Active “Machines” (anything with a MDE Agent installed) within your Microsoft 365 Defender instance, so you can use it even if you do not use any AWS or other cloud-provider servers.
We would be remiss if we didn’t mention the Panoptica Platform! Our multi-layer cloud security solution offers powerful visualization and querying capabilities for a unified Vulnerability Management experience – collecting and aggregating vulnerability data across all your Kubernetes clusters, Servers, and Containers, as well as ingesting code-level vulnerabilities from Snyk, Twistlock or Checkmarx. We provided open-source and premium Threat Intelligence Platform (TIP) vulnerability intelligence data and use our own proprietary graph-based machine learning algorithms to perform further weighting and prioritization of vulnerabilities if you have not defined your own KPIs or Key Risk Indicators (KRIs) for your vulnerability management program. You can Start for Free today with no obligation or scary SDRs knocking on your door!
For those unfamiliar, Amazon QuickSight is a BI service which was launched at AWS’ annual conference, re:Invent 2015, and has steadily grown since then in utility and breadth as a BI tool. QuickSight is a cloud-native BI tool and is a Software-as-a-Service (SaaS) tool within the AWS Cloud footprint that takes care of all infrastructure and services for managing BI workloads. All you need to do is provide data from various sources, as of the time of this post, QuickSight supports over two dozen sources of data including AWS services such as Amazon Aurora or Amazon Redshift as well as 3rd-party sources such as Snowflake or Teradata data warehouses.
QuickSight also comes with several security features “baked-in” such as the ability to set Role-based access controls within QuickSight’s data plane, the ability to segregate data by namespaces, it supports Microsoft Active Directory, AWS IAM and SAML authentication as well as encrypting everything in transit and at rest by default. With low maintenance, great enterprise security features, and a liberal amount of native source support partnered with a relatively low cost-to-feature pricing model – it makes a lot of sense to use QuickSight.
QuickSight does have some terminology that one should be familiar with as well as concepts which will come in handy if you review the code for this solution or want to make sense of QuickSight’s usage and security model on your own. QuickSight manages its own identity store internally, but you can authenticate to use it using SAML, Active Directory, and using AWS IAM principals. You can even invite external members in by email and support anonymous access for embedding – but that is out of scope for the purpose of this blog. Users within the QuickSight identity store can be given defined Roles such as Admin, Author, and Reader and further locked down by selective sharing of various QuickSight resources and attaching additional resource-based IAM policies to the various resources. You must explicitly allow access to specific QuickSight Users and Groups despite their Role and manner of Authentication.
QuickSight has various “primitives” or sub-resources which represent various concepts within the service as whole. A Data Source is a logical record that points to and ingests data from a specified source, and contains credentials, network information, and other metadata to establish these connections. For instance, when using data uploaded to S3, you must provide the URL of a QuickSight Manifest to a Data Source which contains the Universal Resource Indicators (URIs) of the individual files and their formats. If you were to use a relational database running on Amazon Aurora you would need to provide endpoints, Security Group information, and database credentials.
From a Data Source, you can create one or more Datasets. A Dataset is the data which is loaded into QuickSight SPICE (Super-fast Parallel-processing In-memory Compute Engine) and is fully formatted for your usage. SPICE is an in-memory columnar datastore which supports fast changes and queries against data, and has its own limitations, for instance datetime formats must be followed and there is an upper limit to data stored within it. Datasets can also facilitate dynamic value generation, creation of Parameters, inference with Machine Learning models, and joining with other Data Sources which behave like SQL Joins. You can also choose to override data types, label names, or eliminate them from the Dataset. QuickSight can also create a Dataset from other Datasets, adding to the list of ways that data can be prepared.
Finally, you have an Analysis which is created from a Dataset and contains visualizations, Insights (machine learning generated analysis), and optional narratives, hyperlinks, and images to present your data in a consumable way. The Analysis can be further modified using Themes to add specific color patterns, fonts, and presentation modifications as well as Filters which can be automatically applied using Actions. After an Analysis is finished it can be saved into a Dashboard which can be embedded into web applications, shared over email, or printed out. A Dashboard is the ideal way for consumers to see your visualizations, as the Analysis are technically “live.”.
Later in this blog, we will experiment with creating Datasets, an Analysis, and finally sharing it as a Dashboard. While there is support for Templates, you cannot share them publicly, so there is not a simple way to share the formatting that the Panoptica Office of the CISO uses for their own dashboards.
The following prerequisites must be met to fully deploy this solution.
It is also assumed you have some expertise navigating the AWS and Microsoft Defender consoles, as well as using common command line arguments and using the AWS Command Line Interface (CLI).
Creating an Azure Application for Microsoft Defender for Endpoint
Note: These steps were taken straight from the Part 1 of this Series and will not need to be repeated if you have already done them. Feel free to skip ahead to the next section.
In this section we will create and register an Azure Application which will provide credentials we can exchange for OAuth2 tokens that are used to provide authorization to use MDE APIs. We will build the Application in the console, assign, and consent to Permissions, and provide several Python code snippets for basic interaction with the APIs.
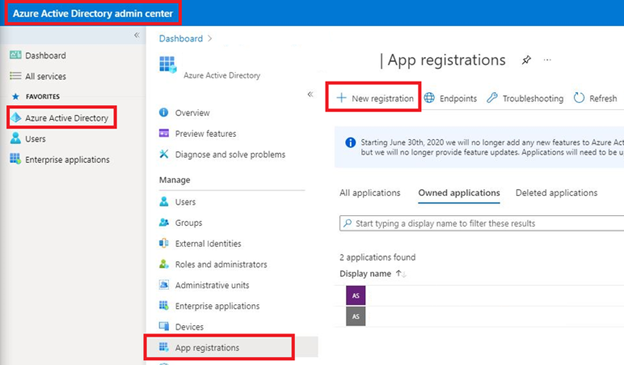
Figure 1 - Azure AD New Application Registration
3. Enter a Name for the App such as “MDE-AWSAutomation-App” and under Supported account types select Accounts in this organizational directory only (${YOUR_COMPANY} only - Single tenant) and select Register at the bottom-left of the screen as shown below (Fig. 2).
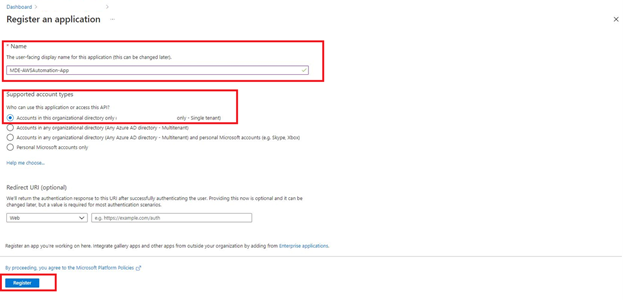
Figure 2 - Azure AD Application Naming
4. After registration, select API Permissions from the left-hand navigation plane, select Add a permission, and in the pop-up menu to the right select the APIs my organization uses tab and enter in “WindowsDefenderATP” as shown below (Fig. 3).

Figure 3 - Adding Permissions to Azure AD Application
5. In the Request API permissions sub-menu (on the right) choose Application permissions and then add the below Permissions. Once done, select Add permissions. These will be needed for various reporting and updates in the future.
All these permissions will be used either directly or recursively as their information is retrieved using various Microsoft Defender APIs. URLs, Threat Intelligence (TI), and User data is not used for this blog post and can be removed as this permission set mirrors what the Panoptica Office of the CISO uses. You can also choose to extend these permissions if you were to conduct “write” oriented operations such as adding Indicators of Compromise (IOCs) or run ad-hoc virus and malware scans.
6. Once complete, choose Grant admin consent for ${YOUR_COMPANY}. to accept the App’s permissions as shown below (Fig. 4).
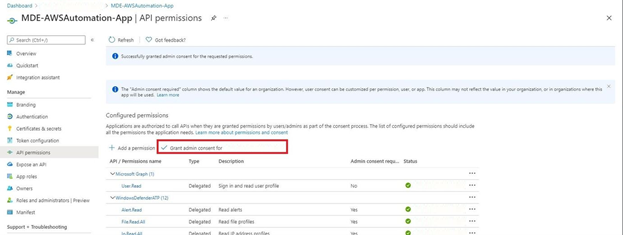
Figure 4 - Azure AD Application Admin Consent
7. In the left-hand navigation pane, select Overview and copy the values for the Application (client) ID and Directory (tenant) ID and create AWS SSM Parameters from them using the code snippets below. Replace “$PLACEHOLDER” with the proper values.
aws ssm put-parameter \

    --name MDE-AWSAutomation-App-ClientID \

    --description 'Application (client) ID for the MDE-AWSAutomation-App Azure Application' \

    --type SecureString \

    --value $PLACEHOLDER

aws ssm put-parameter \

    --name MDE-AWSAutomation-App-DirectoryID \

    --description 'Directory (tenant) ID for the MDE-AWSAutomation-App Azure Application' \

    --type SecureString \

    --value $PLACEHOLDER
8. In the left-hand navigation pane, select Certificates & secrets, choose New client secret, and in the right-hand popup menu give it a description as the creation date and set the expiration to 24 months. Finally, select Add at the bottom, as shown below (Fig. 8).
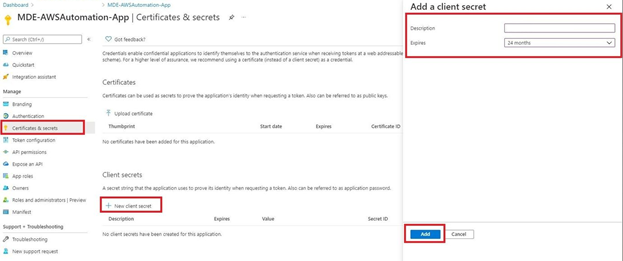
9. Copy the entry for Value (Not Secret ID!) and use it to create another SSM Parameter with the following code. Replace “$PLACEHOLDER” with the proper values.
aws ssm put-parameter \

    --name MDE-AWSAutomation-App-SecretID \

    --description 'Secret ID for the MDE-AWSAutomation-App Azure Application' \

    --type SecureString \

    --value $PLACEHOLDER
Now that you have successfully registered an Azure Application and vaulted the pertinent secrets in encrypted AWS Systems Manager Parameters, you are ready for the next stage of deployment for this solution. Keep the names of your SSM Parameters handy as they will be needed for the AWS CloudFormation template that will deploy this solution.
Now that you have an Azure App created with necessary permissions to interact with the Microsoft Defender APIs, we can deploy an AWS CloudFormation Stack which contains the required services for the remainder of this solution, which are shown in the architecture diagram below (Fig. 5).
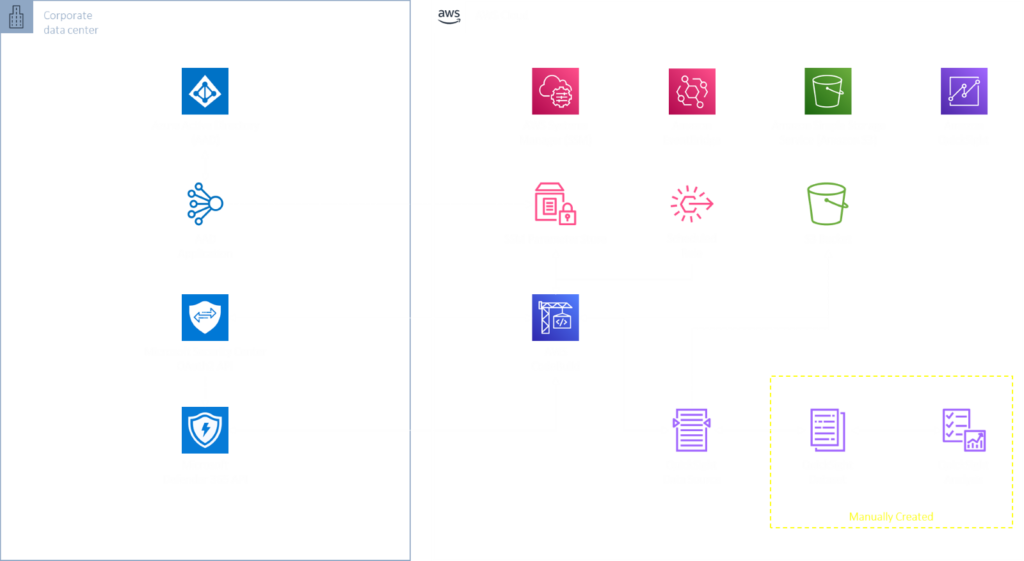
Figure 5 - MDE Part 4 Solution Architecture
A simplified view is that AWS CodeBuild, traditionally used for Continuous Integration, will start on a schedule, and download a Python script from an Amazon S3 Bucket. It will authenticate to Microsoft APIs, gather the required information from MDE, upload the raw data back to S3 and create Amazon QuickSight Manifests and Data Sources for you to use in your Analyses and Dashboards.
We have uploaded the necessary required artifacts onto our Public GitHub, all that is required is for you to configure your AWS CLI for the below commands to work. Ensure you enter a valid S3 bucket for the S3_BUCKET environment variable below. The commands assume you are on an Ubuntu or other Debian-based operating system.
wget https://raw.githubusercontent.com/lightspin-tech/lightspin-office-of-the-ciso/main/blogs/mde_part4/MDE_Reporter_CloudFormation.yml

wget https://raw.githubusercontent.com/lightspin-tech/lightspin-office-of-the-ciso/main/blogs/mde_part4/report.py

pip3 install --upgrade awscli

S3_BUCKET='insert_bucket_here'

AWS_REGION=$(aws configure get region)

aws s3 cp ./report.py s3://$S3_BUCKET/quicksight/report.py

aws s3 cp ./MDE_Reporter_CloudFormation.yml s3://$S3_BUCKET/quicksight/MDE_Reporter_CloudFormation.yml

aws cloudformation create-stack \

    --stack-name MDEonAWSPart4 \

    --template-url https://$S3_BUCKET.s3.$AWS_REGION.amazonaws.com/quicksight/MDE_Reporter_CloudFormation.yml \

    --parameters ParameterKey=OCISOGenericArtifacts,ParameterValue=$S3_BUCKET \

    --capabilities CAPABILITY_NAMED_IAM
To monitor your Stack in the Console at which it is created, take note of the Amazon Resource Name (ARN) of the CloudFormation Stack ARN you will receive in return as exemplified below.
{

    "StackId": "arn:aws:cloudformation:mars-west-2:123456789101:stack/MDEonAWSPart4/EXAMPLE0-8449-11ec-a3d7-EXAMPLE36f0e"

}
By default, the CloudFormation template creates an AWS EventBridge Scheduled Rule to invoke your AWS CodeBuild Project every 24 hours, to manually invoke it navigate to the AWS CodeBuild Console and select the Build projects submenu. Select your CodeBuild project, toggle the Start build menu, and select Start now as shown below (Fig. 6).

Figure 6 - AWS CodeBuild starting build
Upon starting the CodeBuild build you will be automatically navigated to a screen showing an output of logs and progress. Once here, wait until the Status reports have completed as shown below (Fig. 7). If you run into errors, ensure you have uploaded the required scripts into the S3 bucket and specified it correctly as the parameter override when creating your CloudFormation stack.
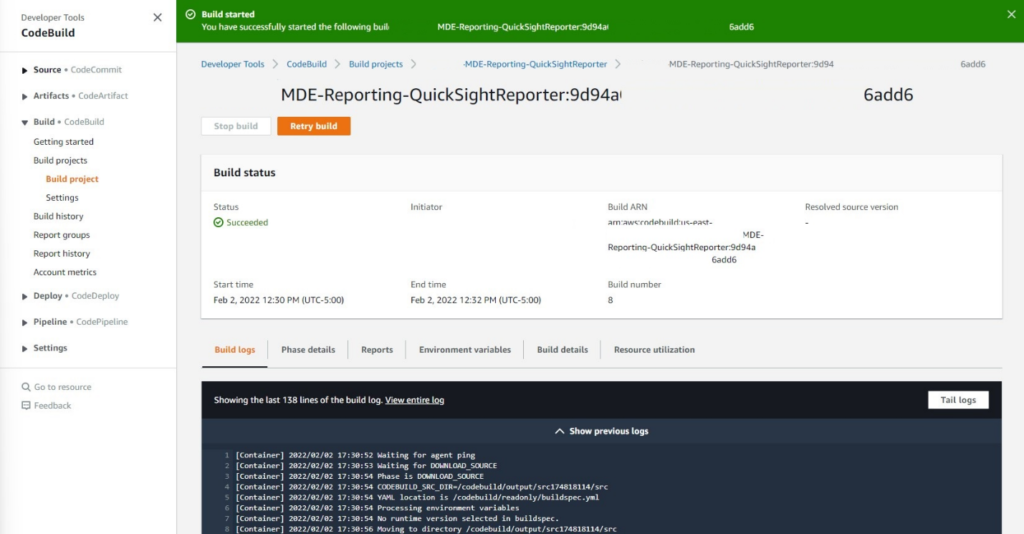
Figure 7 - AWS CodeBuild build logs
Once complete, navigate to the AWS QuickSight console. Once there, select the Datasets menu in the left-hand navigation pane and select New dataset on the upper right-hand corner of the screen (shown below Fig. 8).

Figure 8 - AWS QuickSight new dataset
You will be automatically navigated to the next screen showing a catalog of available Data Sources, towards the bottom of the screen you will see the FROM EXISTING DATA SOURCES section, select the Data Source labeled “MDE_Machines” and select Create dataset as shown below (Fig. 9).
Note: The screenshot was purposely altered to remove much of the menu.
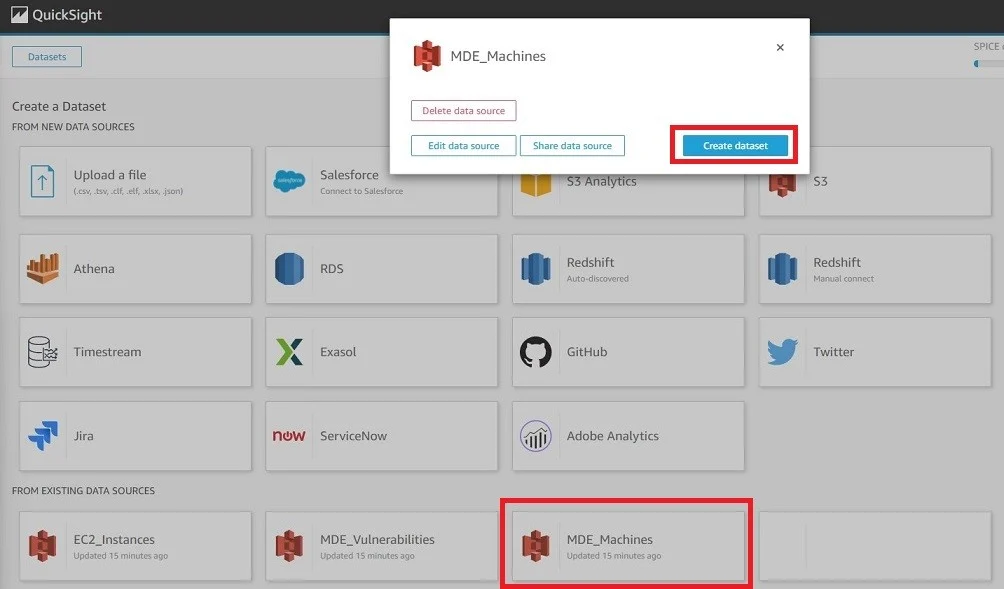
Figure 9 - AWS QuickSight create dataset
Upon creation of the Dataset, select the option to Edit/Preview data as shown below (Fig. 10).

Figure 10 - AWS QuickSight edit/preview dataset
You will be automatically taken to another screen for Dataset modification. Here we can begin to join other Data Sources and manipulate data. The first thing we will do is utilize the Add data functionality to merge and join with the other Data Sources that were created. To do this, select Add data at the top right of the screen, select Data source from the drop-down menu and choose the “MDE_Vulnerabilities” data source as shown below (Fig. 11).
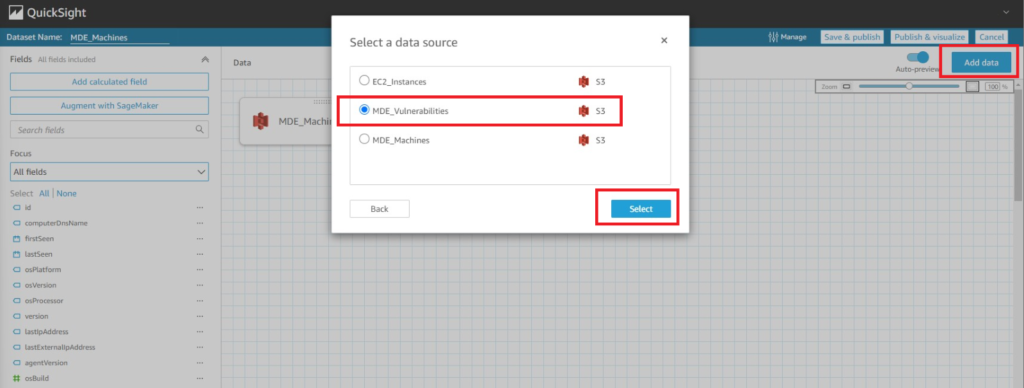
Figure 11 - AWS QuickSight merging data sets 1
In the next screen of the Add data screen, ensure you select the Table and choose Select as shown below (Fig. 12).

Figure 12 - AWS QuickSight merging data sets 2
On the data merging screen, select the connector icons visualized by two dots in between the boxes containing the names of your two Data Sources. A Join configuration screen will appear on the bottom of the screen. Once there, select the “id” field under the “MDE_Machines” Data Source and the “vuln_MachineId” field under the “MDE_Vulnerabilities” Data Source. Ensure the Join type option for Left is selected and choose Apply as shown below (Fig. 13).
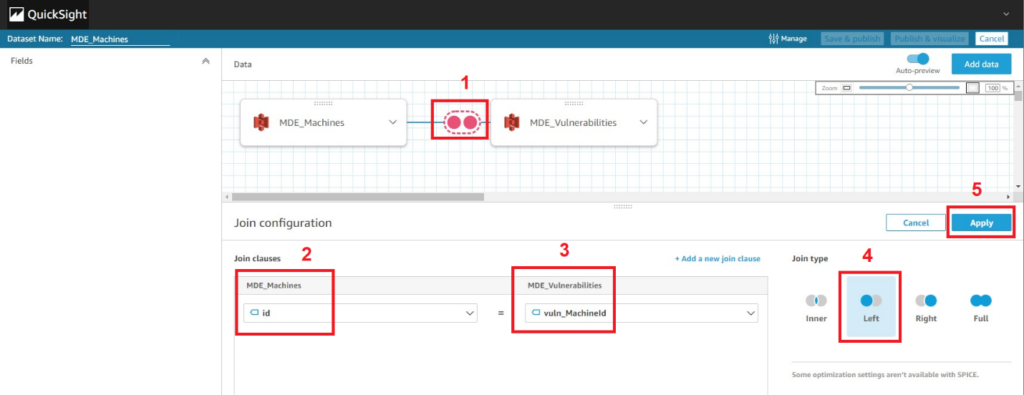
Figure 13 - AWS QuickSight merging data sets 3
Once complete, repeat the steps highlighted in Figures 11 and 12 and instead select the “EC2_Instances” Data Source to merge with. Once at the Join configuration screen again select the “instanceId” field from the “MDE_Machines” Data Source and select the “InstanceId” field from the “EC2_Instances” Data Source with a Left join and apply the selection.
These modifications we have made so far have created Left Joins of vulnerability and EC2 metadata on our Machines which are tracked by MDE. This data source makes for a great representation of our server, endpoint, and cloud server estate. A Left join will ensure that all data in the “source” Data Source (“MDE_Machines”) is retained while adding the other Data Source data only if there was a match in the fields. These kinds of joins technically create multiple rows with duplicative source data. When we reach the Analysis , we will showcase various methods to ensure only unique values are highlighted.
Before moving on, we can perform more edits to our Dataset, such as renaming columns to be more descriptive, settling on a specific data labeling standard such as using Pascal Case or Camel Case capitalization, or removing a specific column. For instance, the field “id[MDE_Vulnerabilities]” is constructed that way as the field “id” already appeared in another Data Source, so the name of the Data Source pertaining to every duplicate entry is appended within brackets. You can edit the name of the field and rename it to “MdeVulnerabilityId” using the steps shown below (Fig. 14).
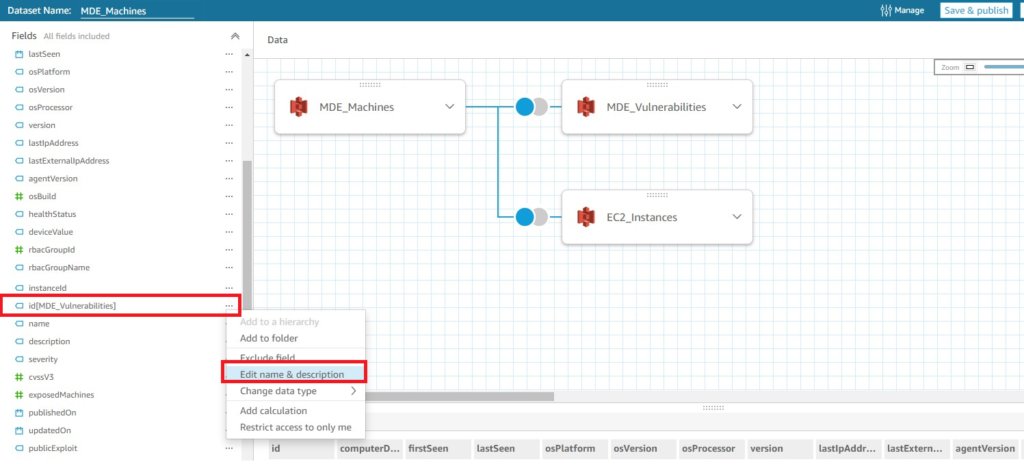
Figure 14 - AWS QuickSight merging data sets 4
You can also use the built-in search function to find a specific field name and remove it by selecting the menu next to the field (denoted by three periods) and selecting Exclude field. You can do this for one of the two fields that pertain to AWS EC2 Instance IDs, as shown below (Fig. 15). Once you are happy with your edits to the Dataset, select Publish & visualize at the top right of the Dataset screen to be taken to a brand-new Analysis.
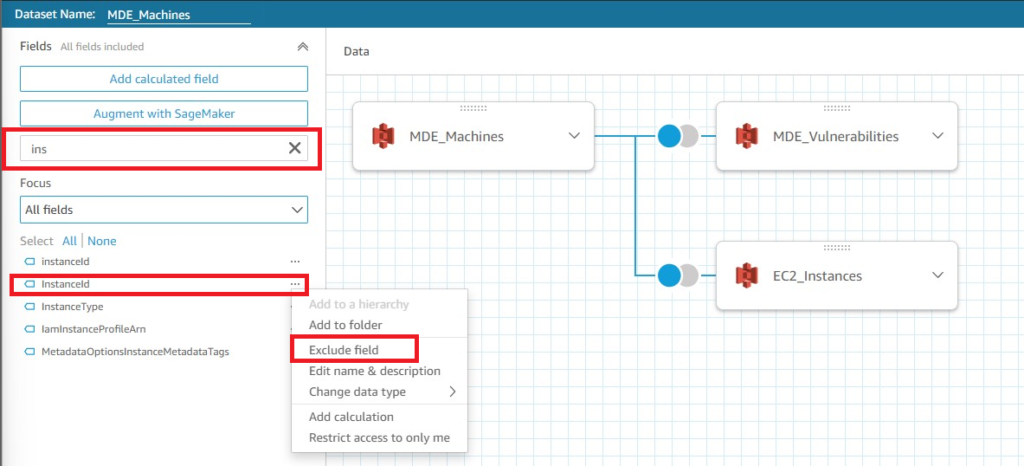
Figure 15 - AWS QuickSight merging data sets 5
Once in your Analysis, it may take a few minutes for all data to be populated, depending on how much you have. We will experiment with modifying the first default Visual that is supplied and adding a new one. For more ideas and walkthroughs, consider viewing more of the AWS QuickSight documentation or looking for AWS QuickSight labs.
For a quick Visual and to have a total amount of Machines covered by MDE, you can use the Key Performance Indicator (KPI) visualization type with a single value. On the bottom-left of the screen select the highlighted symbol for the KPI visualization. At the Field wells screen above, drag the field “id” into the Value field well. Select the drop-down menu of the Value and change the Aggregate to Count Distinct as shown below (Fig. 16). This will show only the unique Machine IDs assigned by MDE which gives you the total amount of Machines without having duplicate entries due to the Joins you performed in the Dataset.
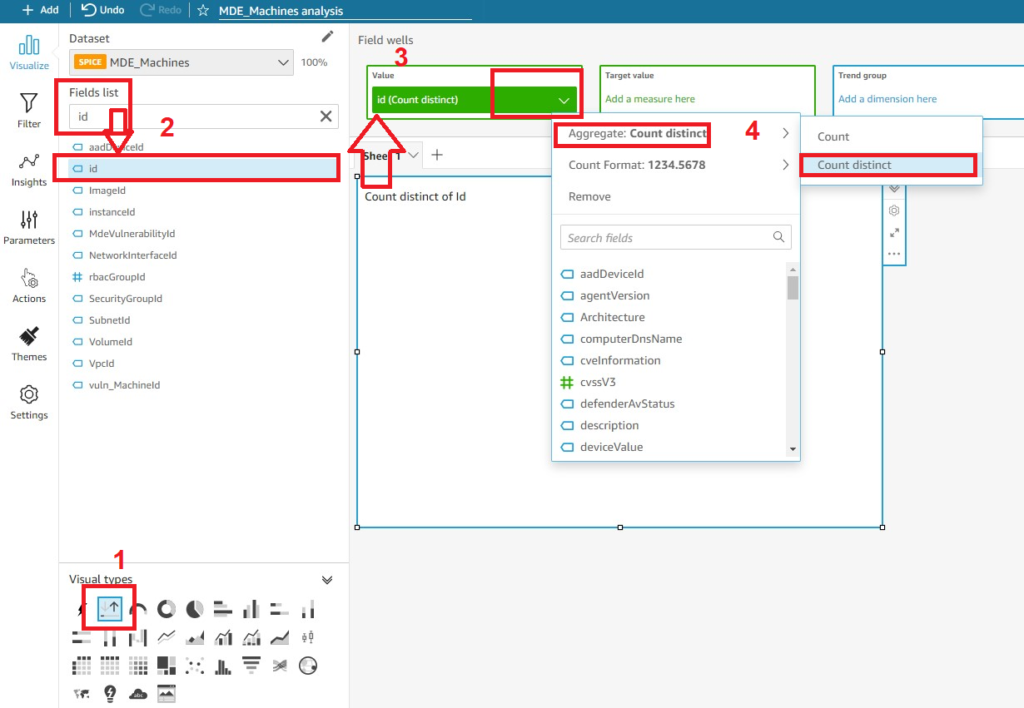
Figure 16 - AWS QuickSight Analysis creating KPI Visualization
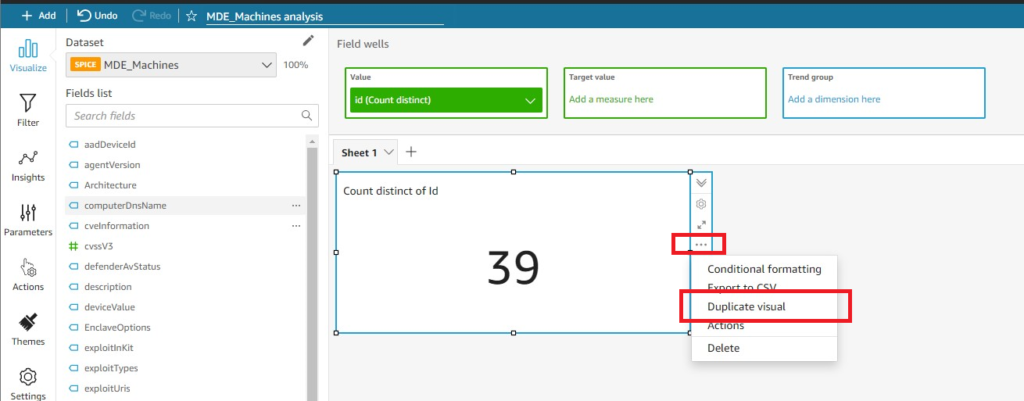
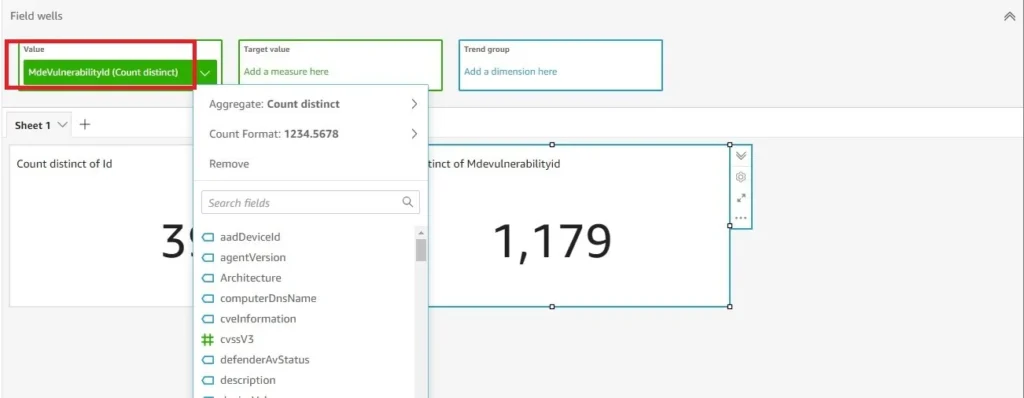
To quickly create a similar Visual, you can use the Duplication feature within the QuickSight Analysis. This is ideal for creating static versions of the same visualization – in our case we do so to show the total amount of unique CVEs within our environment. Select the Visual and toggle the drop-down menu (denoted by three periods) and select Duplicate visual as shown below (Fig. 17).
Once you have duplicated the visual, change the Value field well to the “MdeVulnerabilityId” field, if you renamed it to that, shown in Fig. 18.
There are far more customizations and tricks that can be executed with an AWS QuickSight Analysis, and we will revisit this topic in the future, but this concludes the technical portion of this blog post. There are further enhancements you can do to the Dataset itself such as modifying our provided code to include Alerts and Incidents and User data to perform more targeted remediation and correlation activity. You can enrich the “last seen Public IP” data provided from the Machines API by joining with Geolocation data based on IP to see if machines were used from anomalous locations or an area outside of where your employees currently resolve to backcheck any Location-based Conditional Access policies.
With QuickSight, you can also import different machine learning models to perform regression or specialized risk analysis against various vulnerabilities and weaknesses within your fleet covered by EDR. You can change the Theme of your Analyses to conform to company templates and publish Databases to share via embedded internal tools or federate access across various groups.
In our next planned series, we will explore the use of deception technology for research and defense-in-depth of your organization. We will explore various practical machine learning applications to cloud security such as real-time anomaly detection and vulnerability sentiment analysis. We also have a series planned on championing the concept of SecDataOps and creating a data-first security organization of non-traditional roles.
Stay Dangerous